Last Updated on: 30th December 2025, 04:56 pm
Here’s the work to do this fall to tiptoe through the tulips in spring.
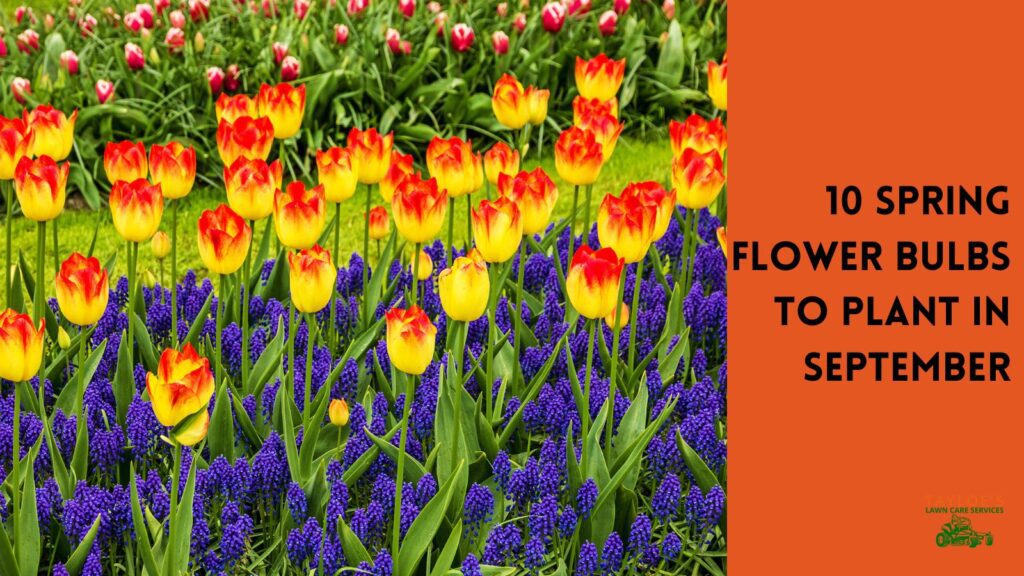
Tulips (Latin: Tulipa) are popular spring flowers that bring beauty and vibrancy to gardens and landscapes. With their wide range of colors, sizes, and forms, tulips have become a beloved choice for many gardeners. However, proper planting and care are essential for successful tulip growth and blooming.
This article will explore the steps for planting tulips, the best time to plant them, the type of soil they prefer, watering and fertilizing tips, common mistakes to avoid, and much more. By following these guidelines, you can enjoy the beauty of tulips and create a stunning display in your garden.
Planting Tulips
Planting tulips is an exciting process that starts with choosing high-quality bulbs. When selecting tulip bulbs, look for firm bulbs that are free from any signs of mold or decay. High-quality bulbs will have a better chance of producing healthy and vibrant blooms.
Once you have your bulbs, it’s time to prepare the planting area. Tulips thrive in well-drained soil, so it’s vital to ensure the soil is loose and not compacted. You can improve the soil’s drainage by incorporating organic matter, such as compost or peat moss, into the planting area.
Next, dig holes to the appropriate depth for your tulip bulbs. Generally, tulip bulbs should be planted about 6 to 8 inches deep. A general rule of thumb is to plant bulbs three times as deep as their length. For example, if you have a 2-inch bulb, you would dig a hole six inches deep.
To simplify that, follow the advice of NC State University and plant the bulbs at 7″ deep.
When placing the bulbs in the holes, ensure the pointy end faces up. This is where the stem and leaves will emerge from. If you’re unsure which end is up, don’t worry. Tulips are forgiving and will find their way to the surface regardless of their initial position.
After placing the bulbs in the holes, cover them with soil and firm them gently to eliminate any air pockets. Be careful not to pack the soil too tightly, which can hinder root growth. Finally, water the bulbs thoroughly after planting to help settle the soil around them and provide them with the moisture they need to start growing.
Best Time to Plant Tulips
The best time to plant tulips is in the fall, typically 6 to 8 weeks before the ground freezes. This allows the bulbs to establish their root system before winter sets in. Planting tulips in the fall gives them the cold period they need to bloom in the spring. By planting at the right time, you can ensure that your tulips will emerge from the ground in all their glory when the weather warms up.
For example, if you live in a region where the ground typically freezes in November, aim to plant your tulip bulbs in late September or early October. This timing will give the bulbs enough time to settle in before the cold temperatures arrive. If you are unsure, call your local agricultural extension office – they can guide you.
Tayloe’s Lawn Care Services takes care of clients in USDA zones 7B and 8a – plant tulip bulbs in our local areas in the fall through the first week of November.
Soil and Location Requirements
Tulips thrive in well-drained soil with a pH between 6 and 7. Providing them with the right soil conditions is essential to ensure healthy growth and blooming. If your soil is heavy or clay-like, you can improve its drainage by adding organic matter, such as compost or peat moss, to the planting area. This will help create a more favorable environment for the tulip bulbs.
Regarding location, tulips prefer a sunny or partially shaded spot in the garden. They need at least six hours of direct sunlight daily to thrive and produce vibrant blooms. However, they can also tolerate dappled shade, especially in regions with hot summers.
For example, if you have a garden bed that receives full sun in the morning but is partially shaded in the afternoon, it would be an ideal location for planting tulips. This way, the tulips can benefit from the morning sun while being protected from the intense afternoon heat.
Watering and Fertilizing Tips
Proper watering is crucial for the successful growth of tulips. After planting, thoroughly water the bulbs to settle the soil and provide the moisture needed to establish their root system. Adjust your watering schedule based on rainfall and the moisture needs of the tulips. Tulips prefer evenly moist soil, so if rainfall is insufficient, you may need to provide supplemental watering.
In addition to watering, fertilizing tulips can help promote optimal growth and blooming. Before planting, you can incorporate a balanced fertilizer into the soil to give the bulbs essential nutrients. You can also apply a slow-release fertilizer in early spring to support the growth of the emerging foliage and flowers.
For example, you can use a granular fertilizer with equal amounts of nitrogen, phosphorus, and potassium, such as a 10-10-10 formulation. Follow the package instructions for application rates and timing. Applying this dressing according to the recommended guidelines will help ensure your tulips receive the nutrients necessary for healthy growth and vibrant blooms.

Common Tulip Care Mistakes to Avoid
While tulips are relatively easy to grow, gardeners should avoid some common mistakes to ensure the best results. Overwatering, inadequate drainage, or improper bulb storage can harm tulips and prevent them from thriving. By following proper care guidelines, you can avoid these mistakes and enjoy the beauty of healthy tulips.
One common mistake is overwatering tulips. While tulips need regular watering, excessive moisture can lead to root rot and other fungal diseases. Providing them with moist, well-drained soil is important, allowing the top few inches of soil to dry out between waterings. This will ensure that the bulbs receive enough moisture without becoming waterlogged.
Another mistake is inadequate drainage. As mentioned earlier, tulips thrive in well-drained soil. If your soil is heavy or tends to retain water, it’s crucial to improve its drainage by adding organic matter or creating raised beds. This will prevent water from pooling around the bulbs and causing them to rot.
Improper bulb storage is another common mistake. If you’re not planting your tulip bulbs immediately, storing them properly is essential. Tulip bulbs should be stored in a cool, dry place with good air circulation until you’re ready to plant them. Avoid exposing the bulbs to extreme temperatures or moisture, which can affect their viability.
By avoiding these common mistakes and following proper care guidelines, you can ensure that your tulips have the best chance of thriving and producing beautiful blooms.
Tulip Varieties and Wild Species
Tulips come in various colors, heights, and shapes, making them versatile for any garden. From the classic single-flowered tulips to the unique parrot tulips, there is a variety to suit every taste and preference. Additionally, exploring wild species of tulips can offer even more options for tulip enthusiasts.
For example, the ‘Apeldoorn’ tulip is a popular variety known for its vibrant red color and large blooms. This tulip variety is a classic choice and adds a bold pop of color to any garden. On the other hand, the ‘Green Star’ tulip features striking green petals and is a unique option for those looking for something different.
Wild species of tulips, such as Tulipa sylvestris or Tulipa clusiana, offer a glimpse into the origins of cultivated tulips. These wild species often have smaller flowers and come in various colors, including yellows, pinks, and whites. Incorporating wild species into your garden can add an element of natural beauty and diversity.
Care After Tulip Blooming
After tulips have finished blooming, it’s essential to provide them with proper care to ensure their health and vigor for the next year. Deadheading is an essential task after tulip blooming. Removing the faded flowers prevents the plants from expending energy on producing seeds. Thus, it directs the plant’s energy back to the bulb, promoting its growth.
However, leaving the leaves until they turn yellow and wither naturally is essential. The leaves continue to gather energy through photosynthesis, which is stored in the bulb for the following year’s blooms. Removing the leaves prematurely can weaken the bulb and result in poor flowering in the future. Once the leaves have turned yellow and withered, they can be gently removed.
For example, imagine you have a bed of tulips that have finished blooming. After deadheading the faded flowers, the leaves are still green and healthy. Resist the temptation to remove the leaves immediately. Allow them to yellow and wither naturally, indicating that the bulbs have stored enough energy for the next blooming season.
Tulip Pest and Disease Control
Like any plant, tulips can be susceptible to pests and diseases. Common tulip pests include aphids, bulb mites, thrips, rodents, and deer. To control these pests, there are various methods you can employ. For example, using insecticidal soap or neem oil can help control aphids. Encouraging natural predators, such as ladybugs or lacewings, can also be beneficial in controlling aphid populations.
Bulb mites are microscopic pests that can cause damage to tulip bulbs. To prevent bulb mites, it’s crucial to inspect bulbs before planting and discard any that show signs of infestation. Proper storage of bulbs in a dry and well-ventilated area can also help prevent bulb mites from infesting the bulbs.
Thrips are another common pest that can cause damage to tulip flowers. To control thrips, use yellow sticky traps or introduce beneficial insects to the garden, such as predatory mites or lacewings.
In addition to pests, tulips can also be susceptible to fungal diseases. Two common fungal diseases that affect tulips are tulip fire and grey bulb. Tulip fire is caused by the fungus Botrytis tulipae and can result in browning and distortion of the leaves and flowers. Grey bulb, caused by the fungus Penicillium tulipae, leads to the development of a grayish mold on the bulbs.
To prevent fungal diseases, practicing good sanitation in the garden is essential. Remove any infected plant material promptly and destroy it to prevent the spread of the disease. Proper watering practices, such as avoiding overhead irrigation and watering at the base of the plants, can also help prevent fungal diseases.
Dividing and Replanting Tulips
Over time, tulip bulbs can become overcrowded and may benefit from dividing and replanting. Dividing tulips every three to five years when they are dormant in the fall can promote vigor and prevent overcrowding. Dividing the bulbs gives them more space to grow and can rejuvenate the plants, leading to better blooming.
To divide tulips, gently dig up the bulbs and separate the offsets, the smaller bulbs that have formed around the main bulb. Make sure each offset has its roots and a portion of the basal plate, which is the bottom part of the bulb. Replant the offsets at the appropriate depth and spacing, following the same planting guidelines as for mature bulbs.
By dividing and replanting tulips, you can ensure that your plants continue to thrive and produce beautiful blooms year after year.
Tips for Using Tulips as Cut Flowers
Tulips make lovely cut flowers and brighten any room with vibrant colors. Here are some tips for using tulips as cut flowers:
- Cut tulips just before the buds fully open: For the most extended vase life, cut tulips when the buds start showing color but haven’t fully opened yet. This will ensure that you can enjoy the full beauty of the flower as it blooms indoors.
- Leave foliage on the stem: Unlike some other flowers, tulips benefit from leaving some foliage on the stem when cutting them. The leaves continue gathering energy for the bulb, contributing to better blooms in the following year.
- Change water daily: Tulips are thirsty flowers, so changing the water in the vase daily is essential. This will help keep the water fresh and prevent the growth of bacteria, which can shorten the life of the flowers.
- Trim the stems: Before placing the tulips in a vase, trim about an inch off the bottom of each stem at an angle. This will allow the tulips to take up water more effectively and stay hydrated.
- Avoid mixing with daffodils: If you plan to arrange tulips in a vase with other flowers, avoid mixing them with daffodils. Daffodils release a sap that can cause tulips to wilt prematurely. Instead, choose other flowers that are compatible with tulips, such as hyacinths or lilies.
By following these tips, you can enjoy the beauty of tulips as cut flowers and prolong their vase life. Remember to change the water daily, trim the stems, and avoid mixing them with daffodils to ensure the best results.
Related Reading:
The Takeaway: Tulips Bring Beautiful Color to Your Springtime Landscape if You Plant Them in the Fall
In conclusion, planting tulips requires careful consideration of various factors, including the best time to plant, the type of soil they prefer, and proper care and maintenance. By choosing high-quality bulbs, preparing the planting area, and following the recommended planting guidelines, you can set the stage for successful tulip growth. Providing adequate water and fertilizer, avoiding common care mistakes, and addressing pests and diseases promptly will help ensure healthy and vibrant tulips.
Tulips offer a wide range of colors, sizes, and forms, allowing you to create a stunning display in your garden. By exploring different tulip varieties and even wild species, you can add diversity and beauty to your landscape. After blooming, proper care, including deadheading spent flowers and allowing the leaves to wither naturally, will ensure the bulbs gather energy for the following year’s blooms. Dividing and replanting tulips when necessary can also promote vigor and prevent overcrowding.
Whether you plant tulips in your garden or enjoy them as cut flowers, these tips and guidelines will help you make the most of these beautiful blooms. With their enchanting presence and stunning colors, tulips will bring joy and beauty to your spring garden. So, embrace the world of tulips and create your vibrant tulip paradise.
If you love gardening and landscape ideas, follow Tayloe’s Lawn Care Services on Facebook – we post almost daily. Need help with making your lawn and landscape look its best ever? Connect by voice of text at 252.287.3376.
Author Profile

- Deborah Tayloe is the CEO and co-founder of Tayloe's Lawn Care Services, LLC. She has a B.S.Ed and holds certificates in soil and water management and herbology from accredited programs.
Latest entries
 Herb GardenJune 23, 202610 Heat-loving plants to add to your herb garden in June
- Trees and ShrubsJune 16, 2026What are the best crepe myrtle colors?
- Lawn CareJune 16, 2026Should I water my lawn during a North Carolina drought, or let it go dormant?
- Flower GardenMay 26, 2026Mr Lincoln Roses: A classic hybrid tea rose